Thursday, 28 July 2016

Spelt Flour Milk Bread

Spelt flour is the one which I started using very recently due to its nutritional values. Spelt flour is made from a cerial grain, known as Spelt, which is also called Dinkel Wheat or Hulled Wheat. It is not same as wheat, even though both are similar in appearance. Spelt has a harder outer shell than wheat. It is nutty and sweet in taste. 

Spelt flour is used in breads, pastas, pizzas, cookies etc. It is less in calories, high in protein and easily digestible. 

The secret of a perfect bread lies in kneading. You must neither knead it less nor more. Also the proofing time matters a lot. The temperature of the oven is another factor. If you take a good care of these things, you will have an amazing outcome.

If you do not have spelt flour, you can make this bread by using only the wheat flour (4 cups wheat flour for this recipe)
I am preparing this bread for the first time and was happy with the result. I have used 50% whle wheat flour and 50% spelt flour in this recipe. Another main ingredient in this recipe is the Vital Wheat Gluten, which gives this bread a firm texture and elasticity. If you do not have VITAL WHEAT GLUTEN, go ahead and replace the whole wheat flour with all purpose flour/maida. 


Ingredients


  • Whole Wheat flour - 2 cups
  • Spelt Flour - 2 cups
  • Vital Wheat Gluten - 1.5 tablespoon (COMPULSORY)
  • Warm milk- 1 cup
  • Active Dry Yeast - 2.5 teaspoons
  • Sugar - 1 tablespoon
  • Honey - 4 tablespoons
  • Salt - 2 teaspoons
  • Melted Butter - 4 tablespoons

Method


  • Take a bowl and combine warm milk, yeast and sugar. Mix well and keep aside in a warm place for 10 minutes. Allow it to froth. Make sure that the milk is warm, neither too hot nor cold. Hot milk kills the yeasts and cold milk does not have the ability to make the yeast active. After 10 minutes, if the yeast does not froth enough, you need to start the entire process from the beginning.
  • In another big vessel, combine whole wheat flour, spelt flour, Salt and Vital Wheat Gluten. Sieve them 2 or 3 times, until everything is combined well.
  • Add honey and 1.5 cups of milk yeast mixture. Use your finger tips to mix then well. Do not knead. Mix until everything comes together.
  • Cover and rest it for 10 minutes or so before kneading.
  • Now add the remaining milk, butter and mix well. Transfer it to a clean flour dusted working area and start kneading the dough. It will be sticky and this is how it should be. I was not able to knead the entire dough together, so I divided them in to 2 portions and worked out in 2 batches. Knead for about 10 minutes. Do not knead for more time, as it will become rubbery if you do so.
  • Wet a clean kitchen towel using hot water and squeeze the excess water from it. Transfer the dough to a greased vessel. Cover with this damp cloth and let it rest in a dark, warm place. Allow it to double in its volume. It will take 40 minutes to 1 hour depending on the temperature. In cold places, it will even take 2 hours approximately. Do not over-proof the dough. Let it rest just until it doubles in size and not more than that
  • After it becomes double in volume, punch the dough to release the air and give it another knead.
  • Grease a loaf pan using melted butter or any flavorless oil. Shape it like a rectangle and rool it to make like a log. Place it in the greased loaf pan.
  • Cover using a damp cloth for about 30 to 50 minutes, again depending on temperature, the time varies. Rest only until the dough rises above the loaf pan. Takecare not to over proof as it will become flat while baking, if you do so. 
  • Preheat the oven @190 Degrees C for 10 minutes. Place the loaf pan in the oven and bake for 35 to 40 minutes. To avoid over browning, once the desired colour is achieved, cover the bread with an aluminium foil and continue baking. 
  • Once done, take out from the oven and brush generous butter on them. The crust will be hard now and as it cools down, it will become soft. The aroma of this bread after brushing the butter is just awesome.
  • Take out of the pan and allow it to cool down completely. Do not slice before it cools down completely. If you slice it early, the bread will not be soft, instead too rubbery. So make sure you cool it at least for 4 hours before you slice them.
  • Slice and enjoy this super soft bread!!

Tuesday, 26 July 2016

Bhindi Masala


Hellooo,

I am here again after a very long gap.

Bhindi Masala Gravy is one of the delicious north indian dish which goes well with chapathi/roti/paratha. Bhindi was not my favorite dish until recently. But still I used to love this dish prepared by my mom. And now, after trying out various recipes for my hubby  (being his favorite vegetable), the love for it slowly started inside me. Yes.. Now I can cook and eat this vegetable atleast twice a week.

For this gravy, we first need to shallow fry the okras/ladies finger in some oil to remove its stickiness, then prepare the onion tomato based gravy, finally cook it and add the okras to this.

Let me share the detailed recipe with you


Ingredients

To Grind


  • Onion - 2 big
  • Ginger - 1/2 inch
  • Garlic - 2 or 3 cloves
  • Green chillies - 2 
  • Grated  coconut - 1 tablespoon
  • Cashews - 5 numbers
  • Cinnamon - 1/2 inch
  • Cloves - 2 numbers
  • Fennel seeds - 1 teaspoon
  • Green Cardamom - 1 number
  • Kalpasi/ Black stone flower - 1 small piece (Optional)
  • Mace - 1/2

Other ingredients


  • Bhindi/Okra/Ladies finger - 20 numbers (Approx.)
  • Tomato puree - 1.5 cups (Scroll down to see the procedure)
  • Oil / Butter - 1 tablespoon
  • Tej patta / Bay leaves - 1, broken
  • Turmeric powder - a pinch
  • Salt - to taste
  • Sugar - 1 or 2 teaspoon
  • Chilli powder - 1 teaspoon (or according to spice level. You can also omit this)
  • Cumin seeds - 1 teaspoon
  • Coriander powder - 2 teaspoons
  • Garam masala powder - 1/2 teaspoon
  • Yogurt - 1 tablepoon
  • Kasuri methi/ Dried fenugreek leaves - 1 tablespoon, crushed
  • Oil for sauteing bhindi - 2 tablespoons
  • Coriander seeds - 1 cup, pressed

Tomato Puree


  • You need 4 medium sized toatoes for this recipe.
  • Boil water in a deep vessel.
  • Take the tomatoes and make slits here and there using a sharp knife. Just 4 slits in each tomato.
  •  When the water comes to a rolling boil, drop in the tomatoes. Let it boil for 4 to 5 minutes. Turn off the heat
  • Cover the lid and keep aside for 5 minutes. Carefully take out the tomatoes and remove the peel off starting from the slits you made on them.
  • Chop the pulp and add it to the blender. Blend it to a smooth puree and use it in the gravy.

Method

  • Wash bhindi well under water. Drain them and wipe each bhindi with a clean kitchen towel. Alternatively, if the time permits, wash and drain the water completely and spread them on a clean kitchen towel. Allow to dry well in room temperature
  • Once dried, keep bhindi inside the refrigerator for half an hour or so. 
  • Cut them in to 2 inch pieces.
  • Heat oil in a kadai and add the chopped bhindis. In a medium heat, fry until they shrink and becomes light brown here and there.
  • Once done, remove from the kadai and transfer them to a plate. Keep aside
  • Grind all the ingredients under "To Grind" in the ingredients section. Make it to a smooth paste, by adding minimum water as possible. Make sure all the cashews and garlic and ground well.
  • In the same pan where you fried the bhindis, add some more oil/butter. Turn the heat on. Add the broken bay leaves and cumin seeds. Saute for 5 seconds.
  • Add the prepared onion paste and saute in a medium heat for about 6 to 7 minutes, until the raw smell fades away and becomes slightly brown in colour. Do not add water, nor burn the mixture at this point. So, adjust the heat accordingly.
  • Add salt, sugar and turmeric powder
  • Add the tomato puree and mix well. Continue on a medium heat. Cover the lid and cook for 15 minutes, stirring it for every 4 minutes or so. Add water to adjust the consistency.
  • Add kasuri methi, cumin powder, chilli powder, coriander powder and garam masala powder. Add the fried bhindis. Cover the lid again and cook for 5 more minutes.
  • Add yogurt/ curd. Mix well. Check for seasoning. Allow it to come to 1 boil and then turn off the heat. Add the finely chopped coriander leaves. Cover the lid and let it sit for 15 minutes or so before serving.
  • Serve with hot phulkas/ rotis/parathas/rice


Friday, 29 April 2016

Paneer Tawa Masala


If you have a set of unexpected guests are you want to make something which is quick, but delicious, this recipe is solely dedicated to you.. This semi dry preparation of paneer can be had not only with indian flat breads, but also with simple bread toasts, brown bread or even with dinner rolls. 

This is a one pot recipe, which is made in tawa, which is used to prepare Indian flat breads or even dosa. The entire recipe is made in the tawa, which makes it unique in taste from other paneer dishes, eventhough the ingredients and preparation methods are same. 

For preparing this Tawa Paneer Masala, you will need Paneer, Onion, Tomato, Capsicum, chillies, Curd, Fresh cream, Kasuri Metghi, some spice powders and coriander leaves. This recipe can be prepared in less than 20 minutes. Make sure you use a medium or large size tawa, so that the gravy won't spill out while cooking. 

You must definitely prepare this in a tawa for its taste and consistency (tawa is shown below with step by step pics). You must not use any other pan to prepare this tawa paneer masala recipe. 

You can add or skip the cream and curd part. But I feel it tastes better when we add some cream and curd. You can even add either of these.

I have a few recipes in this blog, which are made in tawa. They are;

Whole Wheat Tawa Naan
Mushroom Tawa Masala
Tawa Idli

Serve this with any Indian flat bread or just with plain bread or buns. Garnish it with some coriander leaves and squeeze the fresh lime juice before serving. Accompany some onion rings and serve hot!!

Ingredients


  • Paneer - 1 big bowl, cubed
  • Butter - 1 tablespoon
  • Ginger - 1 inch, grated
  • Garlic - 2, grated
  • Onion - 2 nos, finely chopped
  • Tomato - 1 no, finely chopped
  • Capsicum - 1 no, medium sized, finely chopped
  • Kasuri Methi/ Dry fenugreek leaves - 1 tsp, crushed
  • Yogurt - 1 tsp
  • Fresh Cream - 1 tsp
  • Coriander leaves - To garnish, finely chopped.
  • Salt - to taste
  • Turmeric powder - a pinch

Spice powders:

  • Coriander Powder - 2 tsp
  • Chilli powder - 1 tsp
  • Cumin powder - 1 tsp
  • Garam masala/ Kitchen king masala - 1 tsp
  • Pav Bhaji masala- 1 tsp
  • Aamchur powder / Dry Mango powder - 1 tsp

Method


  • Heat Butter in a tawa and add the onions.
  • Now add the green chillies, ginger, garlic, salt and turmeric powder. Cook until the onions are transparent and raw smell of the ginger and garlic disappears.


  • Add the finely chopped capsicums. saute until the capsicum is well cooked
  • Add in the tomatoes and and keep sauteing until the tomatoes are really mushy.
  • Add all the spice powders one by one and mix well.
  • Take a potato masher (Or use the back of a tumbler) and mash the gravy well.
  • Add curd. Mix well. I had some paneer crumbs, I added even that in this stage and gave it a good mix.

  • Now pour a teaspoon of fresh cream to this.
  • Finally, add the paneer pieces and gently mix in the gravy. If you feel the gravy is becoming too thick, sprinkle some water. Let it cook for 3 to 4 minutes and then turn off the heat

  • While serving, squeeze some lime juice, garnish with coriander leaves and onion rings. 

Thursday, 28 April 2016

No Yeast Whole Wheat Tawa Naan


Helllooooo everyone!!

Its a loong loong gap!! And I wasn't able to continue my blogging as before. But now, I am very happy that I am back here and will start updating this every now and then. Thanks for all your concerns. It really means a lot to me and I definitely missed you all..

So, obviously I have a lot and lot in my to do list for this blog, which will be done one by one. And, as so many of the requests are still pending, I will finish them first.

Today, I am going to show you how to make a yeast free whole wheat garlic chilly and coriander tawa naan. Among different varieties of Indian breads, naan has become one of the favorite among all. It is said to be the king of flat breads.

As said, this recipe has no yeast, also no eggs and is prepared using 50% whole wheat flour and 50% all purpose flour / maida. I have also realized that without this 50% maida, the naan come out really flat, and the texture and taste is not that impressive. If you opt to prepare this using whole wheat flour alone, you will need to add the yeast, instead of baking powder and baking soda.

This naan is made in an ordinary tawa, but tastes as same as the one made in oven or in tandoor. The texture is amazing, which is light, crispy and soft inside.

Just in order to make it more flavorful, I added a few chopped garlic, chillies, coriander leaves and onion seeds (kalonji). You can even keep this plain without adding all these extra toppings. But, I kind of like to include these and make it even more delicious. You can have this naan with any curries of your choice or even with dal.

Without any delay, I am going to proceed with the recipe for this Whole Wheat Garlic Chilli and Coriander Tawa Naan.


Ingredients

For dough

  • Whole Wheat flour - 1 cup
  • All purpose flour - 1 cup
  • Yogurt - 1/2 cup
  • Oil - 4 to 5 tsp
  • Baking powder - 1 tsp
  • Baking soda - 1 tsp
  • Salt - to taste

For the topping

  • Garlic - 1/4 cup , minced
  • Chopped coriander leaves - 1/4 cup
  • Green chillies - 2 or 3, finely chopped
  • Onion seeds - few

For cooking the naan
  • Tawa
  • Melted Butter

Method

  • Combine all purpose flour, whole wheat flour, salt, baking powder and baking soda. Mix well using a wired whisk. 
  • Add oil and yogurt. Add enough warm water and knead it to a smooth, sticky dough. The dough should be absolutely sticky. So, do not go crazy and add more flour to it. Smear some oil on the dough and knead it again. Cover and keep aside for an hour or so.
  • Now, take the dough and add as much flour as to make it a soft and non-sticky dough. Make sure it should not be hard. It should be soft. Knead it well again.
  • Divide the dough in to lime sized portions, make balls and keep aside for 10 minutes.
  • Take one dough ball, dust it with some flour and start rolling it using your rolling pin to form a thick circle.
  • Now, sprinkle some chopped coriander leaves, chillies, garlic and onion seeds. Make sure you don't make it more spicy by adding more chillies.
  • Using the rolling pin, just tap on the surface of the rolled dough, so that the toppings just stick in. Gently roll them and make it thin, but not very thin. Just as we roll for roti.
  • Heat the tawa and grease it with some butter or oil. Place the rolled dough on the tawa. The side which has the toppings should be facing upward and the flat side should be in the base.
  • In a medium heat, close the lid and let the bubble form on top. When you see the bubbles, sprinkle some melted butter and flip it the other side. 
  • Sprinkle some melted butter. Cook on both the sides on a medium-high heat, until it attains a golden brown colour on both the sides.
  • Serve hot with any curries of your choice.

Thursday, 8 October 2015

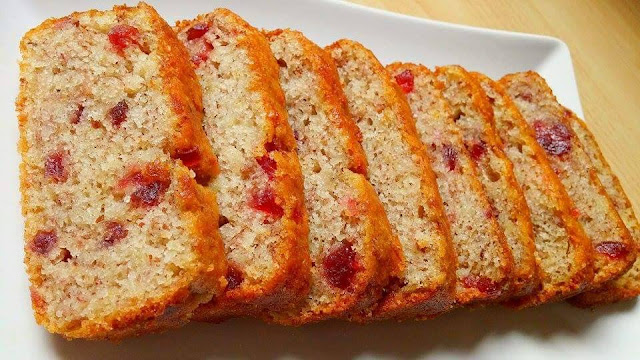
Eggless Whole Wheat Banana and Candied Cherries Cake


Hii friends,

After long long time!!!!
It has been so long since I posted something in this blog.. I came to India a couple of weeks back and got spoiled by all petting and pampering by my parents and in laws. Everyone were so excited to cook for us and so I hardly get any chance to cook now a days. Still, as cooking is my life breath, it is impossible for me to be without cooking for days together. This is the first time I came to India after staring this blog. I showed my blog, dashboard etc to all my relatives and friends. They gave me enough motivation, encouragement and wishes for my future posts.

About this cake.. This super soft, moist and fluffy cake is very low in calories as it is made using whole wheat flour instead of all purpose flour, curds instead of egg and oil instead of butter. I am not a very big fan of cinnamon. But then I started realizing that adding cinnamon powder to banana cakes gives an awesome taste to it. As it is eggless, it can be prepared by vegetarians and non-vegetarians.

Try to use the bananas which are big and has black spots on its skin. The more riper the banana is, the more sweeter your cake will be. 

Have the ingredients and measurements right, the cake will taste simply great. Let's go through the recipe. Try and let me know your feedback.


Ingredients

  • Whole wheat flour -  1 cup
  • Baking powder - 1 tsp
  • Baking soda - 1/2 tsp
  • Cinnamon powder - 1/2 tsp
  • Salt - a pinch
  • Candied Cherries - 1/4 cup, roughly chopped
  • Sugar - 1/2 cup + 2 tblspns
  • Thick unsour yogurt - 1/4 cup
  • Oil - 1/4 cup
  • Banana - 2, medium sized
  • Vanilla essence - 1 tsp
  • Apple Cider Vinegar- 1 tblspn
  • Flax seeds powder - 1 tblspn
  • Hot water - 3 tblspn

Method

  • Preheat the oven @180 deg C. Grease your cake/ loaf pan with oil/ butter. Dust some flour, spread them all around the pan. Tap off the excess flour. This step will allow the cake from sticking to the pan.
  • Mix together flax seeds powder and hot water. Refrigerate for about 15 minutes.
  • Sieve the dry ingredients together for about 2 or 3 times; Wheat flour, baking powder, baking soda, cinnamon powder and salt. This will make the cake more light and spongy.
  • Take some flour in a bowl and mix the chopped candied cherries. Keep aside
  • In another bowl, mix all the wet ingredients one by one; oil, sugar, yogurt, vanilla essence, mashed bananas, apple cider vinegar and flax seeds slurry taken out of the fridge.
  • Now add half of the sifted dry ingredients to the wet ingredients. Fold in gently, as slow as you can. Do not over mix or mix vigorously as it would take away the aeration of the cake.
  • Now add the remaining dry ingredients to the wet ingredients. Mix in slowly until everything is combined
  • Add the flour coated cherries to the batter and fold in gently.
  • Pour the batter to the cake/ loaf pan. Bake in the preheated oven @180 deg C for about 40 to 50 minutes or until the tooth pick inserted comes out clean. The temperature of each oven will vary from each other. So, keep an eye often until it is baked.
  • Once baked, take out of the oven. Run a knife over the edges to separate the cake from the pan.
  • Allow it to cool for 15 minutes before you remove from the pan.
  • Cut / slice once it cools down completely.
  • Enjoy with a cup of tea or coffee